BN Restoration
Early Work
Apart from the motor being stuck, the two
most obvious
challenges to getting the BN back in shape were the overall rust and
the
oil which had become one with the dust and chaff to plug every weep
hole
surrounding the transmission and final drives. New seals were
indicated,
and inspection of the bearings during the disassembly process suggested
they ought to be replaced while things were apart. Did I mention the
sorry
state of the brakes? They were part of the project, as well.
The degree and extent of the rust and pitting
persuaded
me I would be doing some sandblasting. The abrasives used are not
always
sand, and I opted for glass beads in two grades. Regardless which
abrasive
is used, the stuff gets into EVERYTHING. Thus, it made sense to me to
do
the blasting first, then clean up the mess as I started repairs. Of
course,
the humidity of the day can rust newly exposed metal. An
overnight
dew can wreak havoc, so the rear end was cleaned up one side at a time
-- wire brush, blast, dust and prime. Wash, rinse, repeat. Once both
sides
were primed the heavy work could begin.
I dropped the pans, axles and bull gears from the
lower part of each final drive first, with the idea that this would
lighten
up the load to be lifted when the rest of the final drive was pulled
from
the tractor together with its shaft housing. It also makes for a safer
job -- removing those parts first leaves a flat bottom that can be
rested
directly on blocks, so I didn't have to rely on jack stands that can
tip
when muscle is applied to the job. That done, I pulled the housing and
final from the left drive first. I used my engine hoist to do the heavy
lifting and am delighted to report that a two-foot tow strap rigged
just
outboard of the jack pad on the bottom of the shaft housing makes for a
balanced load. The same point works on the right side, though the
balance
is not quite the same (because the brakes are in different
positions)
but not at all unwieldy.
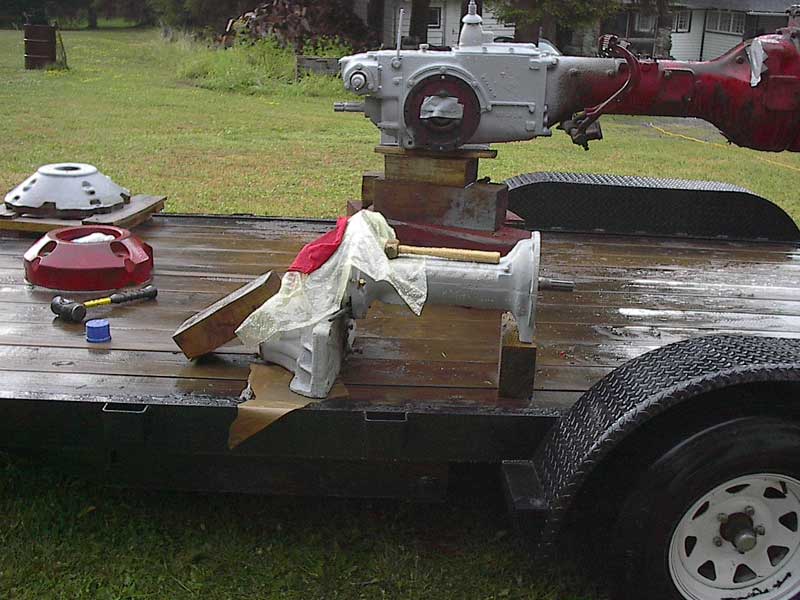
A great deal of sweat and ungentlemanlike language was necessary to
separate
some of the parts. One friend reminded me of the hammer selection rule
-- beat with progressively bigger hammers until you break something,
then
back down one size. Good advice. In general, though, judicious
applications
of heat, hammers of various weights and materials, a little prying, and
liberal doses of verbal lubrication all combined to get things apart.
Once inside, I was actually pleased to find things so dirty near the
critical
parts that the abrasives from the sandblasting were either dry and blew
away very easily or had stuck to the remarkable accretions of oil and
dust,
meaning that they could be easily cleaned away so as not to get into
the moving parts as the work went forward. The ends of the shaft
housings were
cleaned
up with a scraper, some kerosene and a brush.
The seals and bearings are all pretty readily accessible for either
pulling
or driving out. Those in the transmission will try the patience a
little,
but the engineering is apparent and persistence with the
occasional
sanity break will get it apart. Lessons learned on the left side
survived
the brief storage period in my feeble mind, and were applied to the
other
side of the tractor to great advantage. (The general rule in repairing
things that there are two of is that the second repair will take
one-fourth
the time of the first). With all the bearings out, I cleaned the
sludge from the inside of the final drive housings, paying special
attention
to the seats for the new bearings and seals. All the shafts, spacers,
and
loose hardware got a good cleaning with kerosene. I polished up the
seal
and bearing surfaces on the shafts and axles with some brake cleaner
and
a Scotch-brite pad. Being as I had brake cleaner at hand, it seemed a
good
time to knock the rust off the brake drums, too.
Things went back together pretty easily, though I've got to admit I was
surprised at how much tighter things fit with those new bearings in
there.
Left side done, on around to the right.
I've gone into some detail here (more than most might be interested in)
and you may notice that I have not yet mentioned duct tape. After six
straight
days of beautiful wrenching weather (sunny, highs in the low 80s) and
not
even a dew to complicate things, you'd know that it had to rain on my
parade
sometime. The shower started up just as I finished driving the
differential
shaft on its bearing into the housing. All I needed was to bolt it up
to
the transmission. Of course, I had the bearing open on the
outside
end of the housing. On the transmission itself, the very hole the shaft
needed to fit into was open, with its bearing and seal. The plastic to
cover the housing was easy, and a hammer and block of wood to hold it
down.
For the transmission, I was able to fashion a little lean-to of duct
tape,
carefully layered to shed water. Worked like a charm. I must admit
being
impressed by the foresight of the engineers at International Harvester,
who ordered that the support pads on the inner end of the housing be
cast
in a dimension that makes any piece of lumber sold with a 6-inch
dimension
(meaning that it is really 5-1/2) just perfect for supporting
everything.
Clever folks!
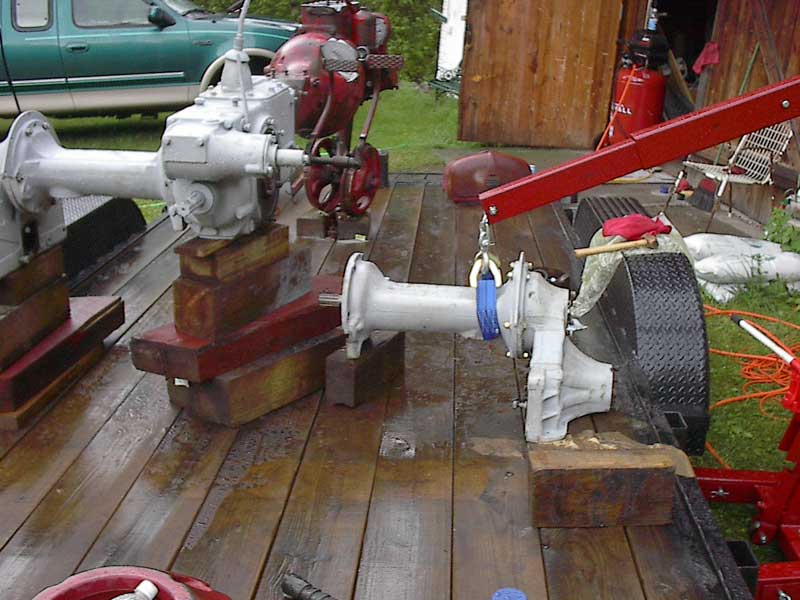
This shot shows how I rigged the engine hoist to lift the assembled
housings
up to the transmission. That blue gadget is a two foot nylon axle
tiedown,
usually used for lashing cars down to flatbed trailers. The point where
I've put it balances everything really nicely on the left side where
the
brake drum and band are on the inside end. On the right the brake
assembly
is on the outer end, so the balance isn't quite as nice but is
certainly
safe and still easy to handle.
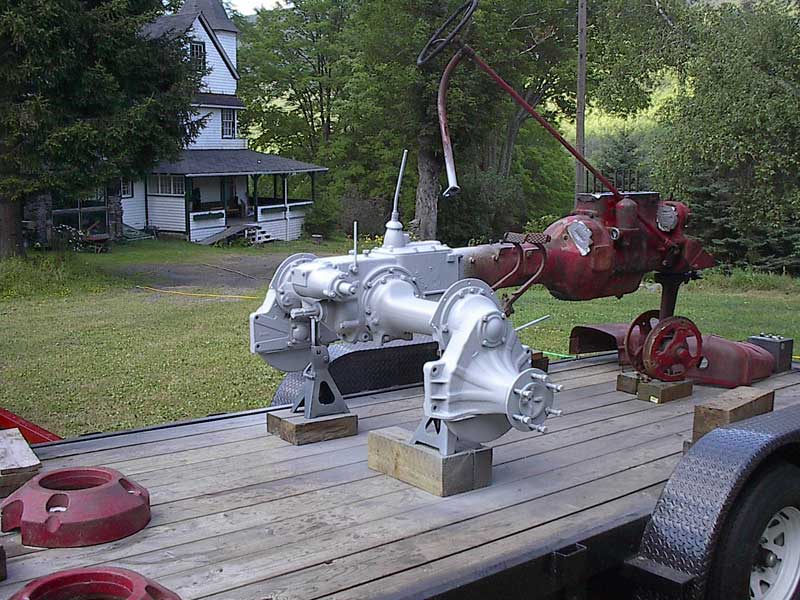
And here she is all buttoned up. Once the housings were on the
transmission,
I had to switch back to jack stands to get the bull gears and axles
back
in. I had the transmission cover with the shifter off to clean
out
the inside of the tranny, and because oil had been seeping out around
it.
A new gasket there and one on each of the lower pans, and everything
was
bolted up tight. The last step was to take a brush and a degreaser and
clean off the handprints and smudges. Wash, rinse, repeat. A few spots
that got bumped or dinged needed sanding, and a last coat of primer was
put on. All that's left back here is to put the wheels and the rims
with
the big new sneakers on the back.
The next step will be to roll her down onto the ground and begin the
serious
dismantling. The front end will come away, the engine will come off and
be mounted on a stand, and the torque tube pulled and hauled out into
the
field for a serious sand blasting and cleaning.
The
Next
Step
Putting
Things
Back Together
A Very Good Friend
An Honorable Mention
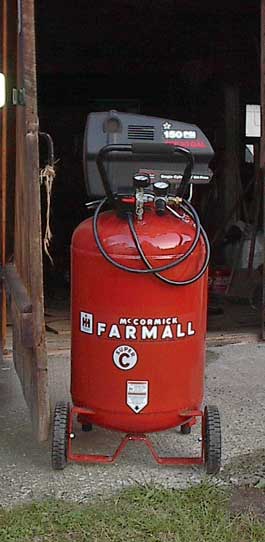 This is my good
friend. It slices, it dices, makes perfect Julienne fries. You hook it
to an impact wrench and bolts that haven't been touched in 55 years
magically
come out. Hook a spray gun to it and unsightly blemishes disappear.
Want
to cut some rivets? No problem, they make an air hammer with any number
of punches and chisels to fit. And sand blasting! I can't believe I
worked
the SuperC over by hand when Sears Roebuck had a carload of these
things
looking for good homes.
This is my good
friend. It slices, it dices, makes perfect Julienne fries. You hook it
to an impact wrench and bolts that haven't been touched in 55 years
magically
come out. Hook a spray gun to it and unsightly blemishes disappear.
Want
to cut some rivets? No problem, they make an air hammer with any number
of punches and chisels to fit. And sand blasting! I can't believe I
worked
the SuperC over by hand when Sears Roebuck had a carload of these
things
looking for good homes.
Back to
Tractor
Doings
Back Home